Tag 13
1 Dokumentationsaufträge
1.1 Best Practices beim Datenbankdesign
1.1.1 Relational vs. Schemaless
Bei relationalen Datenbanken werden Informationen mittels SQL Joins geholt. Da MongoDB allerdings mit Documents und nicht mit Tabellen arbeitet, muss dieses Schema mittels Arrays und Nested Documents abgebildet werden.
{
  "first_name": "Paul",
  "surname": "Miller",
  "cell": "447557505611",
  "city": "London",
  "location": [45.123, 47.232],
  "profession": ["banking", "finance", "trader"],
  "cars": [
    {
      "model": "Bentley",
      "year": 1973
    },
    {
      "model": "Rolls Royce",
      "year": 1965
    }
  ]
}
Anstatt Daten in verschiedene Tabellen aufzusplitten, nutzen wir Arrays und Nested Documents um Informationen strukturiert abbilden zu können.
Wichtig: in diesem Fall keine separaten Collections erstellen
1.1.2 Embedding vs. Referencing
Um bei MongoDB FKs und PKs zu erzwingen, muss das Referencing mittels des Operators $lookup genutzt werden. $lookup kann mit einem LEFT OUTER JOIN verglichen werden.
Beispiel
Collection order erstellen:
db.orders.insertMany( [
   { "_id" : 1, "item" : "almonds", "price" : 12, "quantity" : 2 },
   { "_id" : 2, "item" : "pecans", "price" : 20, "quantity" : 1 },
   { "_id" : 3  }
] )
Collection inventory erstellen:
db.inventory.insertMany( [
   { "_id" : 1, "sku" : "almonds", "description": "product 1", "instock" : 120 },
   { "_id" : 2, "sku" : "bread", "description": "product 2", "instock" : 80 },
   { "_id" : 3, "sku" : "cashews", "description": "product 3", "instock" : 60 },
   { "_id" : 4, "sku" : "pecans", "description": "product 4", "instock" : 70 },
   { "_id" : 5, "sku": null, "description": "Incomplete" },
   { "_id" : 6 }
] )
Die Collections verknüpfen (referenzieren):
db.orders.aggregate( [
   {
     $lookup:
       {
         from: "inventory",
         localField: "item",
         foreignField: "sku",
         as: "inventory_docs"
       }
  }
] )
{
   "_id" : 1,
   "item" : "almonds",
   "price" : 12,
   "quantity" : 2,
   "inventory_docs" : [
      { "_id" : 1, "sku" : "almonds", "description" : "product 1", "instock" : 120 }
   ]
}
{
   "_id" : 2,
   "item" : "pecans",
   "price" : 20,
   "quantity" : 1,
   "inventory_docs" : [
      { "_id" : 4, "sku" : "pecans", "description" : "product 4", "instock" : 70 }
   ]
}
{
   "_id" : 3,
   "inventory_docs" : [
      { "_id" : 5, "sku" : null, "description" : "Incomplete" },
      { "_id" : 6 }
   ]
}
Vor- und Nachteile Referencing
Vorteile:
- Kleinere Documents
- Documents können kleiner als 16MB gehalten werden (Limit von BSON)
- Nützlich wenn nicht alle Daten oft aufgerufen werden müssen
- Weniger Redundanzen in den Informationen
Nachteile:
- Komplizierte Abfragen
Vor- und Nachteile Embedding
Vorteile:
- Eine Query = alle Daten laden
- Keine Joins
- CRUD-Operationen sind ACID-fähig
Nachteile:
- Query auf grosse Documents kann (bei doppelten Daten) die Performance beeinflussen
1.2 Übung Indexierung
1.2.1 Vorbereitung
Neue Datenbank phones erstellen:
use phones
Funktion importieren um Testdaten zu generieren:
    populatePhones = function(area, start, stop) {
      for(var i = start; i < stop; i++) {
        var country = 1 + ((Math.random() * 8) << 0);
        var num = (country * 1e10) + (area * 1e7) + i;
        var fullNumber = "+" + country + " " + area + "-" + i;
        db.phones.insert({
          _id: num,
          components: {
            country: country,
            area: area,
            prefix: (i * 1e-4) << 0,
            number: i
          },
          display: fullNumber
        });
        print("Inserted number " + fullNumber);
      }
      print("Done!");
    }
1.2.2 Daten generieren
Daten generieren:
populatePhones(800, 5550000, 5650000)
Daten kontrollieren:
db.phones.find().limit(2)
[
  {
    _id: 88005550000,
    components: { country: 8, area: 800, prefix: 555, number: 5550000 },
    display: '+8 800-5550000'
  },
  {
    _id: 28005550001,
    components: { country: 2, area: 800, prefix: 555, number: 5550001 },
    display: '+2 800-5550001'
  }
]
1.2.3 Indices auslesen
Indices der bestehenden Collections anzeigen:
db.getCollectionNames().forEach(function(collection) {
     print("Indexes for the " + collection + " collection:");
     printjson(db[collection].getIndexes());
});
Indexes for the phones collection:
[
  {
    v: 2,
    key: {
      _id: 1
    },
    name: '_id_'
  }
]
1.2.4 Testen
Perfomance ohne Indices testen:
db.phones.explain("executionStats").find({display: "+1 800-5650001"})
...
executionTimeMillis: 61, // Ausführzeit in Millisekunden
...
totalDocsExamined: 100000, // Anzahl Documents
...
stage: 'COLLSCAN', // Typ des Scans
...
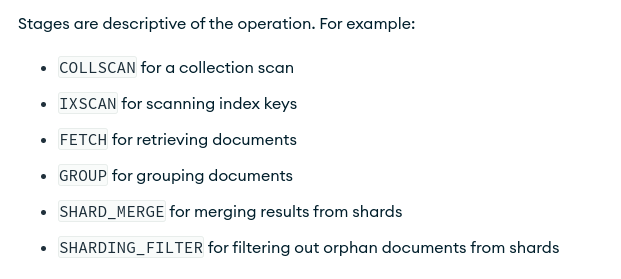
https://www.mongodb.com/docs/manual/reference/explain-results/
1.2.5 Index erfassen
Index erstellen
db.phones.createIndex(
  { display : 1 },
  { unique : true, dropDups : true }
)
Die Indexe sollen unique sein und dropDups entfernt Duplikate.
Perfomance nochmals mit Indices testen.
...
executionTimeMillis: 1,
...
totalDocsExamined: 0,
...
stage: 'FETCH',
...
1.3 Übung Replication
1.3.1 Vorbereitung
Data-Directories für 3 MongoDB-Instanzen erstellen:
mkdir ./mongo1 ./mongo2 ./mongo3
1.3.2 Instanzen starten
Pro Instanz ein Terminal (muss offen bleiben):
mongod --replSet book --dbpath ./mongo1 --port 27011
mongod --replSet book --dbpath ./mongo2 --port 27012
mongod --replSet book --dbpath ./mongo3 --port 27013
1.3.3 Starten
Auf eine Instanz per Shell einloggen und Initialisierung für Replikation starten:
rs.initiate({
    _id: 'book',
    members: [
      {_id: 1, host: 'localhost:27011'},
      {_id: 2, host: 'localhost:27012'},
      {_id: 3, host: 'localhost:27013'}
    ]
})
Status kontrollieren:
rs.status().ok
1.3.4 Insert testen
Verbindung auf gesamten Cluster muss genutzt werden.
mongo mongodb://localhost:27011,localhost:27012,localhost:27013/replicaSet=book
Ersten Test-Insert durchführen:
db.echo.insert({ say : 'HELLO!' })
Auf den Terminals der Instanzen sollte viel Output angezeigt werden.
Resultat des Tests überprüfen:
db.echo.find()
1.3.5 Replikation testen
Eine Instanz killen. Die anderen Instanzen sollten weiter funktionieren.
1.4 Übung Sharding
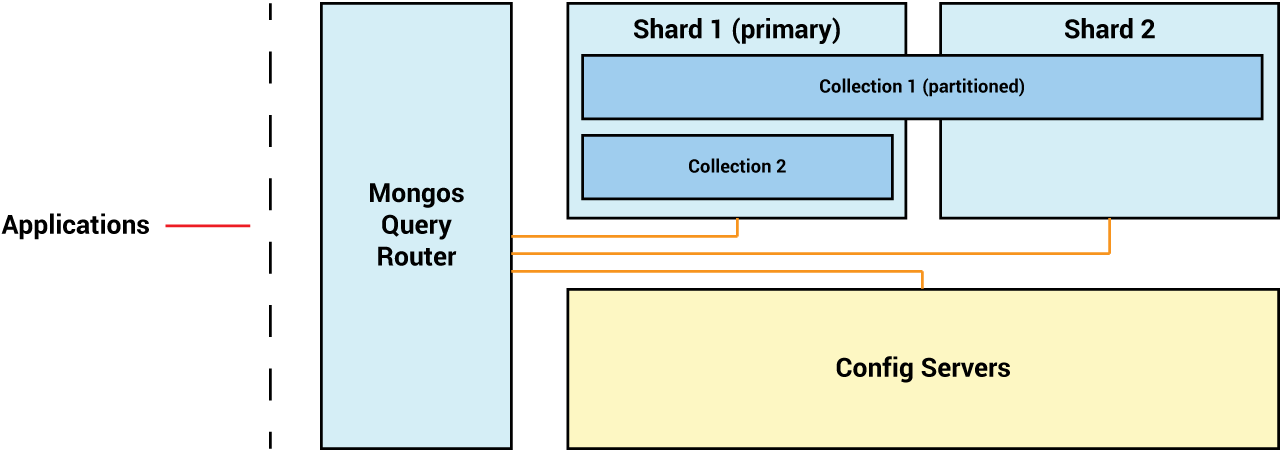
Folgende Grafik ist das Ziel:
1.4.1 Vorbereitung I, Config Server
Config-Ordner erstellen und Instanz starten:
mkdir ./mongoconfig
mongod --configsvr --replSet "config" --dbpath ./mongoconfig --port 27016
Auf Server einloggen:
mongosh localhost:27016
Cluster initialisieren:
rs.initiate()
1.4.2 Vorbereitung 2, Shards einrichten
Data-Verzeichnisse einrichten:
mkdir ./mongo4 ./mongo5
Zwei Instanzen als Shard-Server starten:
mongod --shardsvr --replSet "shard1" --dbpath ./mongo4 --port 27020
mongod --shardsvr --replSet "shard2" --dbpath ./mongo5 --port 27021
1.4.3 Shards initialisieren
Auf beide Shards verbinden und initialisieren:
Shard 1
mongosh localhost:27020
rs.initiate()
Shard 1
mongosh localhost:27021
rs.initiate()
Aktuelle Konfiguration überprüfen:
rs.status()
1.4.4 mongos (Query Router)
Mongos-Instanz starten (Verbindung mit Config-Server wird aufgebaut):
mongos --configdb config/localhost:27016 --port 27025
1.4.5 Shards hinzufügen
Auf mongos-Instanz verbinden:
mongosh localhost:27025
Shards hinzufügen:
sh.addShard("shard1/localhost:27020")
sh.addShard("shard2/localhost:27021")
Status der Shards kontrollieren:
sh.status()
1.4.6 Sharding einführen und testen
Sharding ist zwar aktiviert, aber noch nicht konfiguriert.
Auf der Datenbank populations Sharding aktivieren (auf mongos-Instanz):
sh.enableSharding("population")
Collection cities auf die Shards aufteilen. Dies mit einem Hashing auf dem Attribut country als Shardkey:
sh.shardCollection("populations.cities", { "country": "hashed" })
Neue Datensätze einfügen:
use populations

db.cities.insertMany([
  {"name": "Seoul", "country": "South Korea", "continent": "Asia", "population": 25.674 },
  {"name": "Mumbai", "country": "India", "continent": "Asia", "population": 19.980 },
  {"name": "Lagos", "country": "Nigeria", "continent": "Africa", "population": 13.463 },
  {"name": "Beijing", "country": "China", "continent": "Asia", "population": 19.618 },
  {"name": "Shanghai", "country": "China", "continent": "Asia", "population": 25.582 },
  {"name": "Osaka", "country": "Japan", "continent": "Asia", "population": 19.281 },
  {"name": "Cairo", "country": "Egypt", "continent": "Africa", "population": 20.076 },
  {"name": "Tokyo", "country": "Japan", "continent": "Asia", "population": 37.400 },
  {"name": "Karachi", "country": "Pakistan", "continent": "Asia", "population": 15.400 },
  {"name": "Dhaka", "country": "Bangladesh", "continent": "Asia", "population": 19.578 },
  {"name": "Rio de Janeiro", "country": "Brazil", "continent": "South America", "population": 13.293 },
  {"name": "São Paulo", "country": "Brazil", "continent": "South America", "population": 21.650 },
  {"name": "Mexico City", "country": "Mexico", "continent": "North America", "population": 21.581 },
  {"name": "Delhi", "country": "India", "continent": "Asia", "population": 28.514 },
  {"name": "Buenos Aires", "country": "Argentina", "continent": "South America", "population": 14.967 },
  {"name": "Kolkata", "country": "India", "continent": "Asia", "population": 14.681 },
  {"name": "New York", "country": "United States", "continent": "North America", "population": 18.819 },
  {"name": "Manila", "country": "Philippines", "continent": "Asia", "population": 13.482 },
  {"name": "Chongqing", "country": "China", "continent": "Asia", "population": 14.838 },
  {"name": "Istanbul", "country": "Turkey", "continent": "Europe", "population": 14.751 }
])
1.4.7 Kontrolle
Statistiken für Shards anzeigen:
db.cities.getShardDistribution()
1.4.8 Anwendung
Wenn jetzt ein find() mit dem explain() untersucht wird, kann man das Sharding sehen:
db.cities.find().explain()